不论如何,如果相比其他的脚本语言,你更喜欢或更擅长 Python 的话,这一章番外篇就是为你准备的。暂时用不上 Python 的读者也不用丧气,本系列文章原计划中没有这部分内容,所以权当作附赠的吧。
为什么要用 Python
介绍 Python,当然不仅仅是因为“有读者需要”,毕竟这门语言若是用得上的人寥寥无几,我可能私下就回复掉,而不至于特意写一篇文章了。
**Python 是数据处理的利器。**工科、理科、乃至很多完全没有编程背景的文科人士1,都有用 Python 来处理数据的需求。
熟悉效率工具的读者,对 Python 应该也不陌生。
那么,在 Automator 中如何使用 Python 这一利器?出于通用性考虑,我将提供 Python2.7 和 Python3 两套模板(既然能坚持读到这里,相信你懂的,有些学校/公司至今抱着 2.7 版本不撒手),即便你并没有太专业的编程知识,也可以查一下自己在用的 Python 版本,然后套上模板完事儿。
两个基础模板
下面是 Python2/7 和 Python3 两种模板。
Python 2.7
2.7 版本的模板相对简单,和 Shell 脚本章节的设置非常相似:
- Shell 设置为
/usr/bin/python - 输入作为 stdin
- 脚本模板间下方:
#!/usr/bin/env python

mport sys
#你的其他模块

or f in sys.stdin:
    #你的脚本
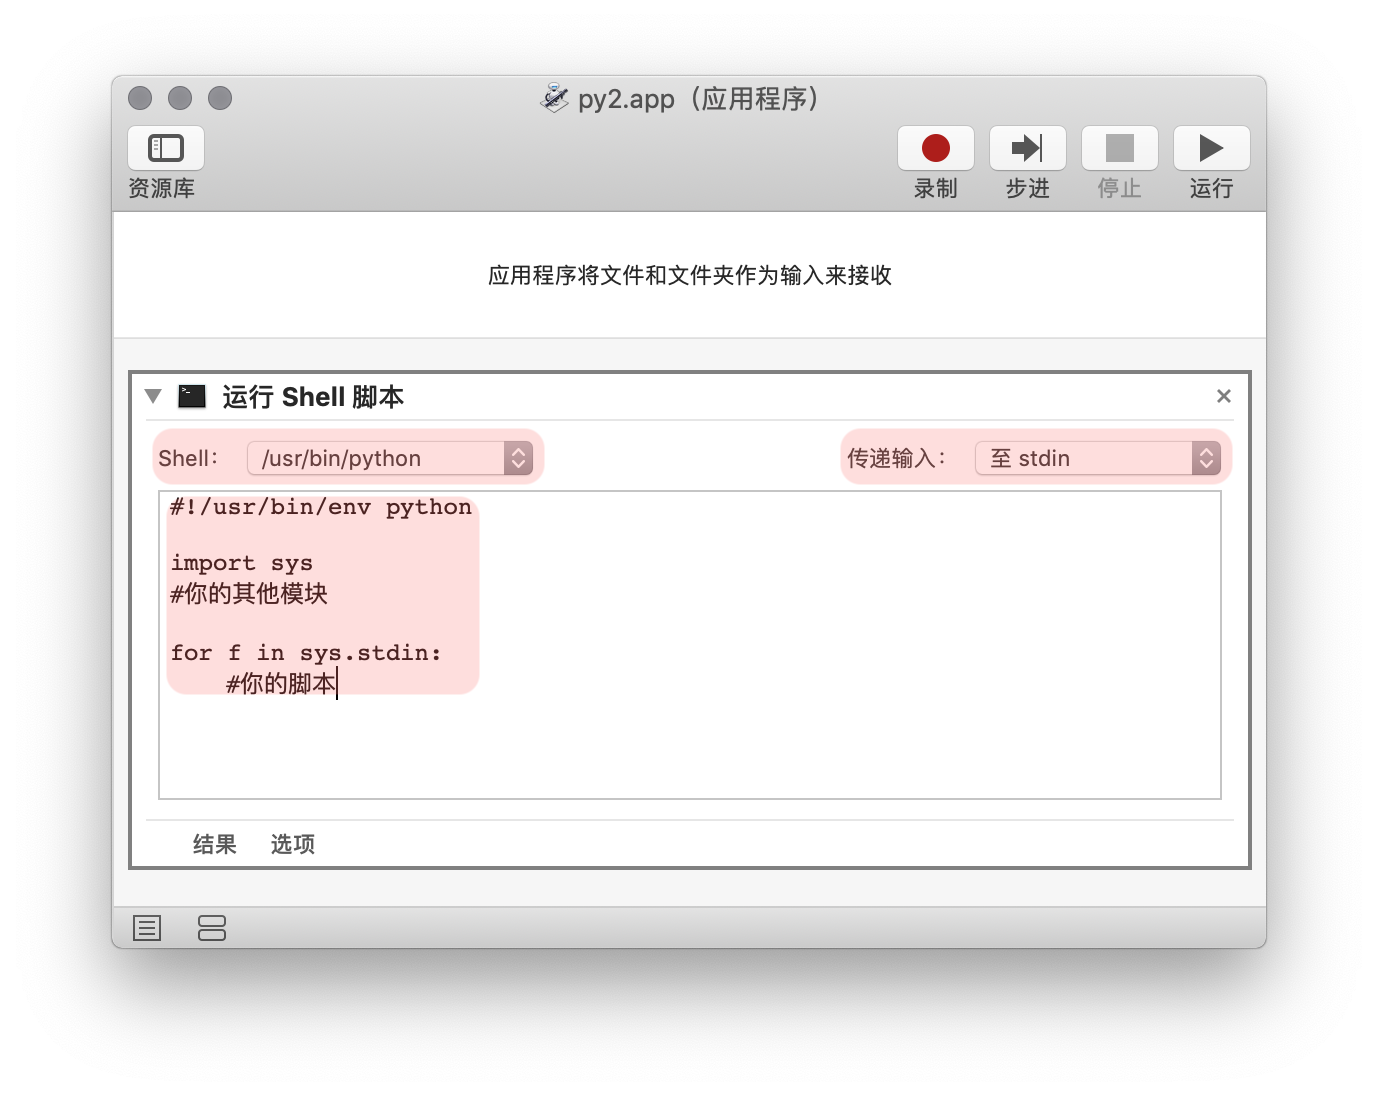
在这个模板里,环境变量、文件输入、批处理之类的都帮你收拾好了。不过 Python 有一点比较特殊,就是需要导入各种功能模块,所以把你的脚本搬进模板时也不要忘记把模块装上。
Python 3
想要在 Automator 直接使用 Python3 就麻烦了。一般我们在脚本编辑器里写 Python 代码时,只需要在开头申明一下环境变量就能调用 Python3,可惜在 Automator 里这不奏效。不信邪的话,你可以试试强制指定使用 Python3:
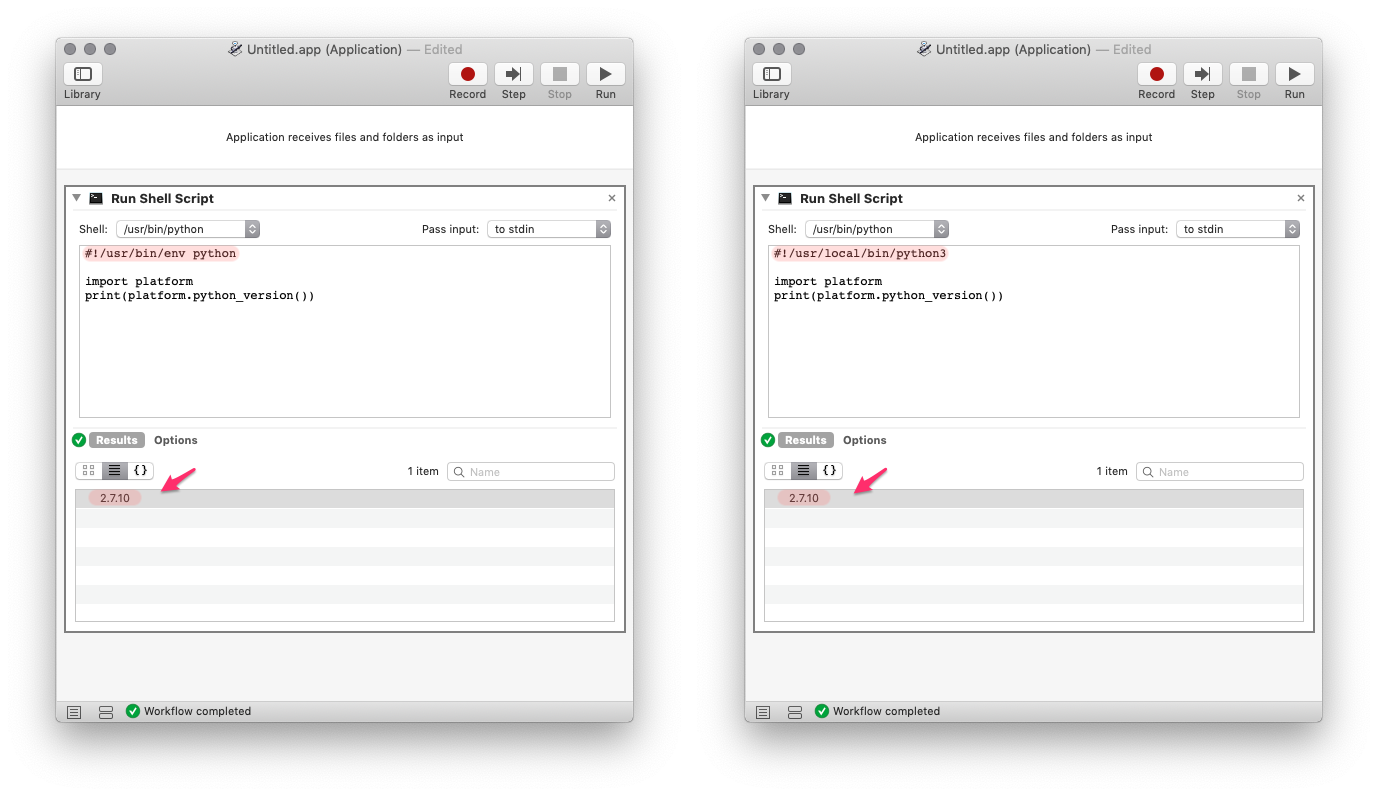
很不幸,最后你发现拿在手里的还是 Python2.7。这是因为,我们已经指定了 Shell 为 /usr/bin/python,脚本里写啥都于事无补2。所以换个思路,不用 /usr/bin/python,直接通过 bash 调用 Python3 怎么样?
- 将 Shell 设置为
/bin/bash - 将输入设为作为自变量
- 脚本如下:
runpy3 () {
/usr/local/bin/python3 << 'EOF' - "$@"

import sys
#你的其他模块

for f in sys.argv:
    #你的脚本
EOF
}

runpy3 "$@"
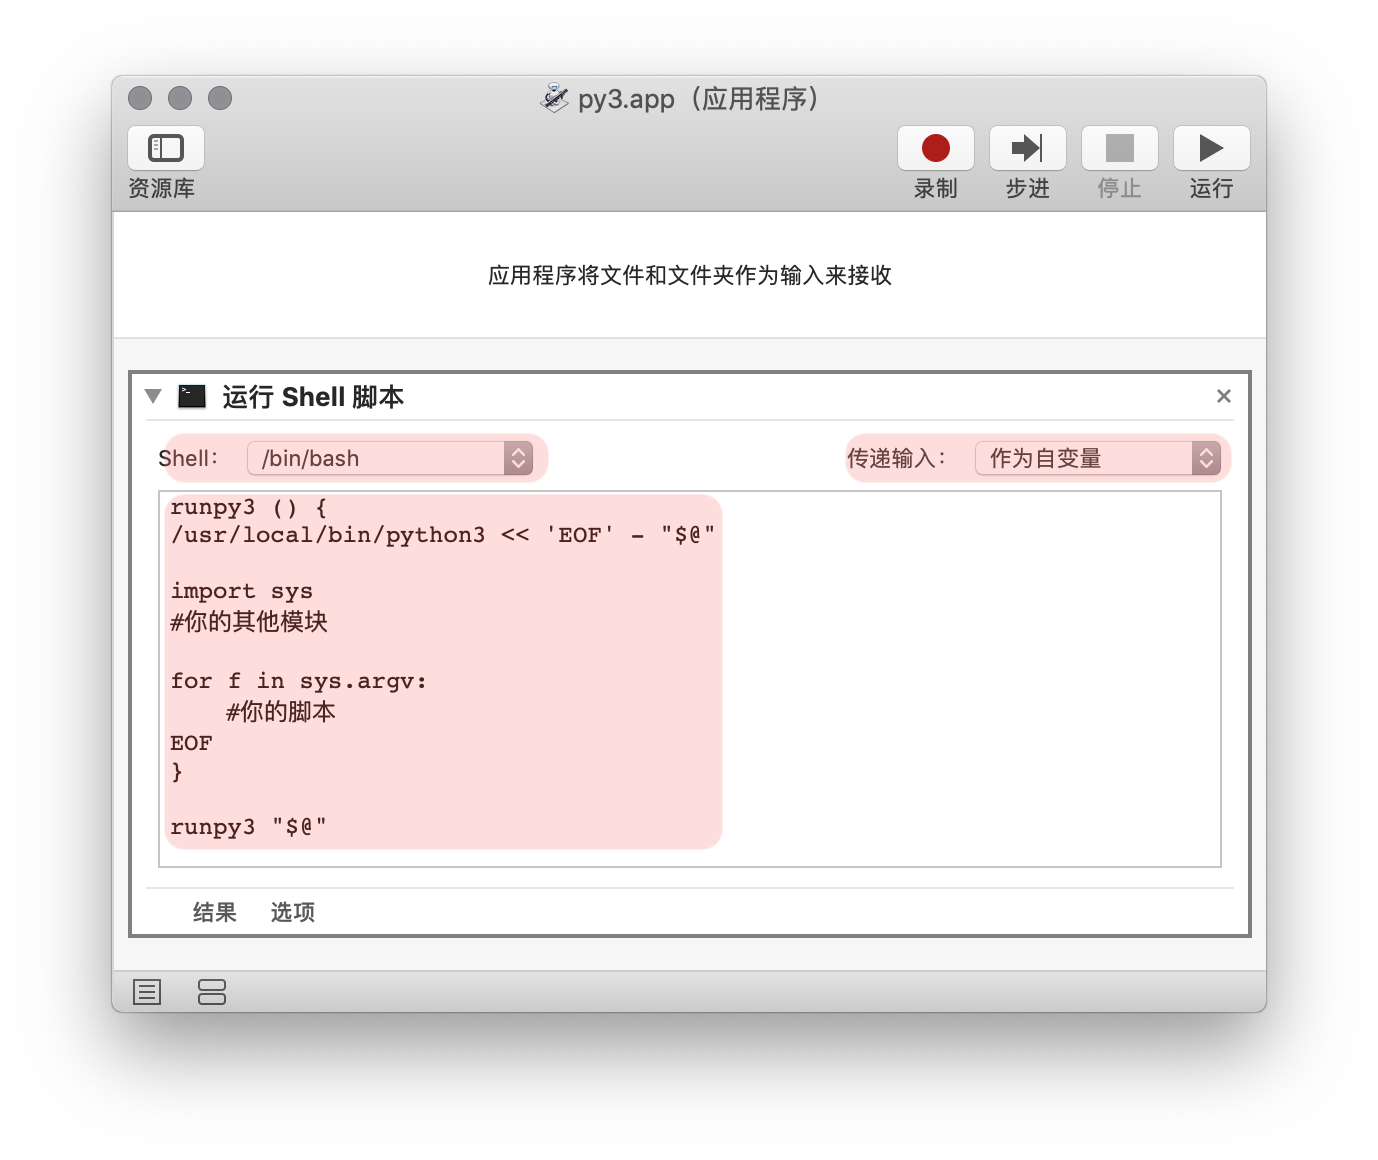
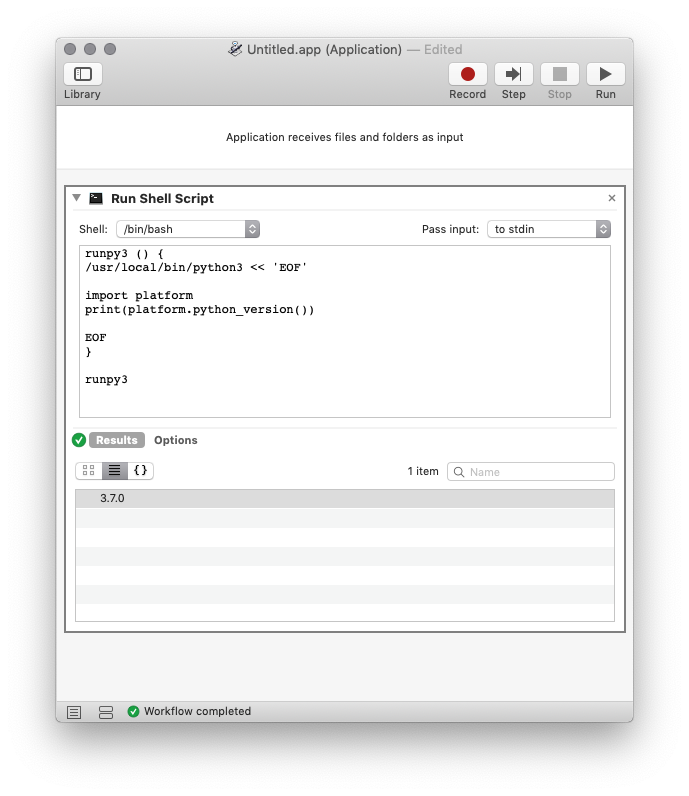
再来测试一下,终于看见 Python3 了。接下来的事儿交给你,把自己的脚本填进去吧。
如何查看 Python 的运行结果
和使用 AppleScript/Shell 脚本时一样,我们也希望能看到 Python 的运行结果,而不是瞪着一只黑箱乞求它运行成功。最合适的方法还是在系统通知里显示运行的结果或状态提示。
我们照例来看两个例子,一个使用 Automator 自带的模块,一个利用 Python 脚本,简单和详细的要求都能满足。
简单版的大家都再熟悉不过了(如果你读过前两章的话),老规矩套上通知模块:
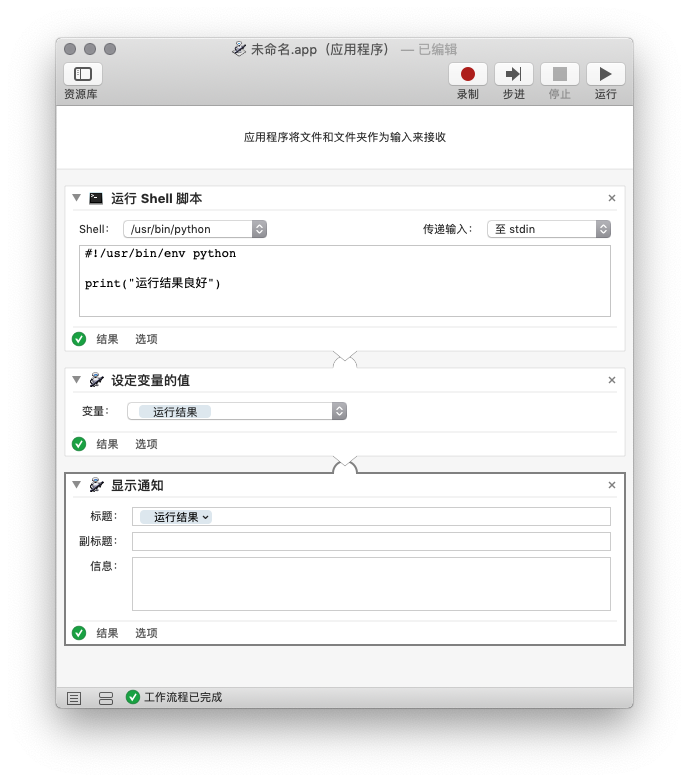
进阶一些,还是用脚本。脚本方案实质上还是在借用 AppleScript,所以之前学的 macOS 通知模板知识照样能用。下面提供的模板已经解决了零零碎碎的工作,你只需要套用进自己的 Automator 动作,然后自定义两个地方:
这里是通知内容:填进自己通知标题。可以把整行"这里是通知内容"换成脚本中出现的变量,具体的各位 Python 玩家请自行组合。这里是通知信息:填进通知信息。同样可以使用变量。
from subprocess import call

noti_title = "这里是通知内容"
noti_msg = "这里是通知信息"
noti_cmd = 'display notification \"' + \
    noti_msg + '\" with title \"' + noti_title +'\"'

call(["osascript", "-e", noti_cmd])
搞定。

实战:做一个 JSON 美化工具
说到 Python 脚本最适合的使用场景,可能 JSON 数据的处理就是第一个。
先别急着关网页,其实玩过 iOS 自动化的读者,多多少少都接触过 JSON——捷径里面常见的扒网页动作,往往就要出来网页返回来的,什么豆瓣电影数据、图片地址、视频网址都藏在里面。为什么要用“藏”这个说法呢?看看捷径返回来的 JSON 数据你就知道了。

这样的数据看起来当然不方便,于是有人开发了一些网页版 JSON 格式化工具。其实也有离线使用的办法,马上来看看 Automator 是怎么解决的。
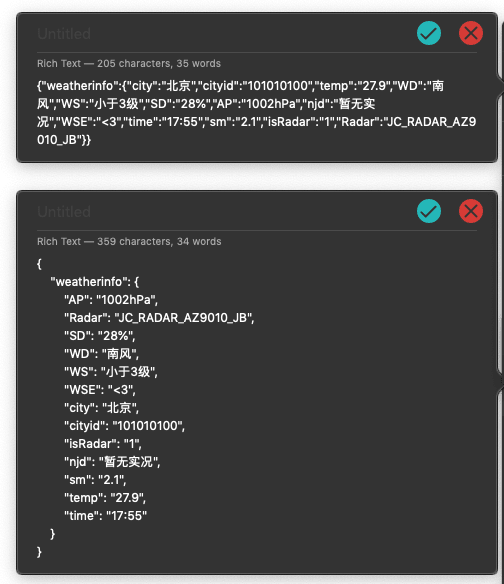
这回我们在 Automator 里使用 Python 2.7,Shell 选择 /usr/bin/python,传递输入作为自变量,脚本在配图之后奉上。
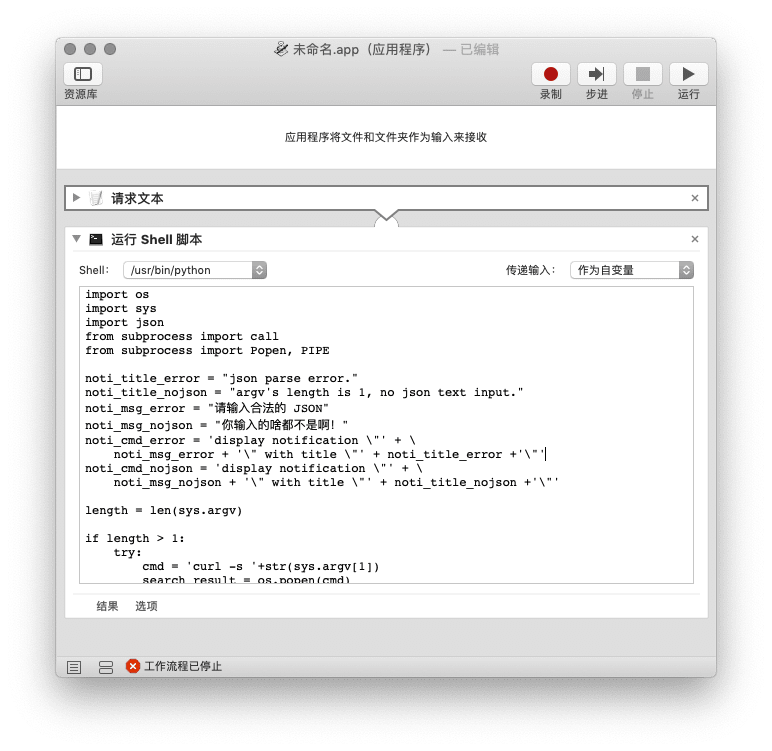
import os
import sys
import json
from subprocess import call
from subprocess import Popen, PIPE

noti_title_error = "json parse error."
noti_title_nojson = "argv's length is 1, no json text input."
noti_msg_error = "请输入合法的 JSON"
noti_msg_nojson = "你输入的啥都不是啊!"
noti_cmd_error = 'display notification \"' + \
    noti_msg_error + '\" with title \"' + noti_title_error +'\"'
noti_cmd_nojson = 'display notification \"' + \
    noti_msg_nojson + '\" with title \"' + noti_title_nojson +'\"'

length = len(sys.argv)

if length > 1:
    try:
        cmd = 'curl -s '+str(sys.argv[1])
        search_result = os.popen(cmd)
        jsonObj = json.loads(search_result.read())
        formatJsonStr = json.dumps(jsonObj,indent=4,ensure_ascii=False,sort_keys=True)

        scpt = '''
            on run {clipboard_content}
                tell application "System Events"
                    set activeApp to name of first application process whose frontmost is true
                    activate
                    display dialog the ["JSON Formatted! Copy to clipboard? \n\n" & clipboard_content] buttons {"Copy", "No Thanks"} default button 1 cancel button 2
                end tell

                set result_button to button returned of result as string

                if result_button is "Copy" then
                    set the clipboard to clipboard_content

                end if
            end run'''
        args = [formatJsonStr]

        p = Popen(['osascript', '-'] + args, stdin=PIPE, stdout=PIPE, stderr=PIPE)
        p.communicate(scpt)
    except Exception, e:
        call(["osascript", "-e", noti_cmd_error])
else :
    call(["osascript", "-e", noti_cmd_nojson])
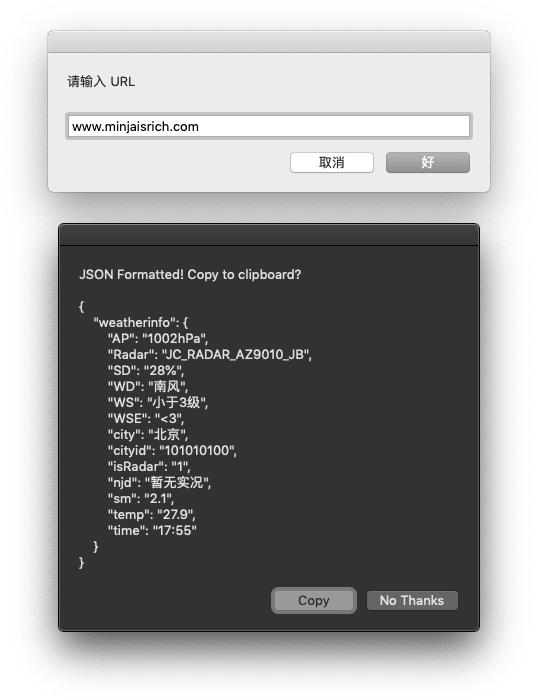
运行时填入想要捣鼓的网页,Automator 就会弹出格式化好的 JSON 结果(如果太长的话可能会在屏幕上顶天立地)并询问你要不要拷贝到剪贴板。
JSON 数据处理只是 Python 的各项特长之一,其他玩法还是留给更专业的玩家吧。

